
I have recently begun playing with flyback transformer power supplies. Good clean HV fun! Easy too! Here are my results so far...
All images can be clicked for a larger picture.
Flyback transformers are commonly used to power the cathode ray tube (CRT) in a TV or monitor, but they do have other uses. They create high voltage at high frequencies. Flybacks can be obtained through surplus outfits and scavenged from a variety of equipment, with televisions being a prime source.
WARNING: The human nervous system does not respond to the high frequencies produced by these circuits. This means that you can burn yourself badly without knowing it. Just because you can't feel it doesn't mean that it isn't happening! These are known as "RF" (radio frequency) burns. I played too much with a plasma globe one day. I felt nothing at the time, but later my hand was sore. Stupid, I knew better. So DON'T draw arcs to your body. I would advise sitting reasonably far away from your experiments. Note too that charges can build up on objects a couple of feet away. I have been bitten by caps left lying on the same table. Just goes to show that caps of any size should be caged with a wire across them at all times. Ya never know how it might get charged up...
Here are some pictures of flybacks transformers.

The first one I bought for US$ 3. It has an internal rectifier, and even after I dug it out of the epoxy, performance was still poor. The next two were given to me by the ever kind and helpful Francis Rutherford at the Regional Occupations Program and Electronics Lab at Mendocino High School. One had a built in multiplier or something, and put out almost nothing. An identical one I got free but new did the same thing. The other had a built in diode, and I never tried digging it out, although it performed OK. The last one is a winner though, I got 3 of these for 12 bucks. No diode, and a strong performer.
Here is a picture of an arc being drawn, a plasma globe, a quick and dirty Marx generator and an ion motor being run off of one of my flybacks.


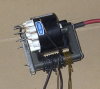
The heart of the flyback system is the driver. So far I have tried two different circuits. One is the classic circuit found on many web sites using one 3055 transistor. I copied this schematic from http://www.stanford.edu/~gmiller/flyback.html .

As you can see, it's a very simple circuit. It's theory of operation is simple too. When voltage is applied the transistor allows current to flow. The primary coil is energized and creates a magnetic field, which in turn induces voltage on the secondary coil. At the same time, it creates voltage in the feedback coil, and this current switches the transistor off. With the transistor off, the feedback coils are de-enegized, allowing the transistor to conduct again, repeating the cycle. The nifty thing about this (and the next) circuit is it automatically drives the flyback at it's resonant frequency. The values of the resistors aren't critical, anything close will work. Here is a picture of my single transistor driver circuit.

Resistor-wise, if you look closely, you can see I am using 2*50 ohm resistors in parallel to achieve 25 ohms, and 2*100 ohms and a 50 ohm resistors in series to achieve 250 ohms. These resistors are way overrated at 10 watts, but they barely get warm and can be gotten from Radio Shack. This circuit works pretty well, but the next circuit works much better, and is almost as easy to build.
I got this schematic from http://www.geocities.com/CapeCanaveral/Lab/5322/fbt1.htm .
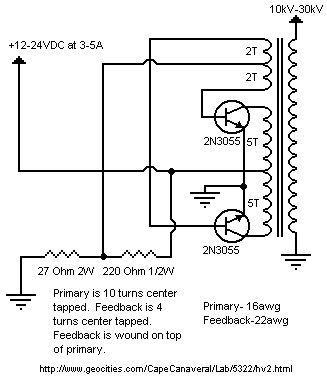
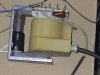
As you can see, all this schematic adds is an extra transistor, so unless you want to experiment with the differences between the two circuits as I did, build this one. This schematic is referred to as a "push pull" oscillator. The number of windings shown on the primary is a good place to start, but remember that less wraps on the primary increases the turns ratio between the primary and the secondary. This give you more volts! I have used as little as one turn on the primaries, and measured somewhere between 36-54 kV, pulling 10 amps! Naturally, I blew that transformer in a poof of smoke and flame, it arced over between the primary and the secondary. I haven't finished my final system, but here is a picture of a "rat's nest" style setup.

Results using the above circuit with the transformer detailed below were:
|
In
|
P. Turns
|
F. Turns
|
Out
|
Draw
|
Freq.
|
Res.
|
|
12
|
1
|
1
|
409
|
10
|
27
|
100
|
|
12
|
1
|
1
|
540
|
10
|
27
|
200
|
|
12
|
2
|
2
|
260
|
4
|
23
|
100
|
|
12
|
2
|
2
|
245
|
4
|
23
|
200
|
|
5
|
1
|
1
|
215
|
4
|
n/a
|
100
|
|
5
|
1
|
1
|
210
|
4
|
n/a
|
200
|
|
5
|
2
|
2
|
90
|
4
|
18
|
100
|
|
5
|
2
|
2
|
103
|
4
|
18
|
200
|
The columns are, in order: Input voltage in VDC, number of primary turns, number of feedback turns, output voltage measured through a standard 100:1 HV probe to a DMM so multiply by 100, DC supply current, output frequency in kHz, and resistor value for the primary resistor in ohms.
There are some discrepancies in the result. For example, in all cases but one increasing the resistor value increased the output voltage. I have been having difficulty getting reliable voltage readings. For example, when I hold the probe I get much lower readings than if I put it on the glass table. Even little things like if the test leads cross each other make a large difference, so all measurements here must be taken with a grain of salt. Nonetheless, they serve to give an indication of what to expect. I must say that from experience, I am sure I was pushing at least 40kV or more. The plasma spewing from this beast was impressive! An inch away from a glass table, the secondary was blasting plasma in an area at least the size of a nickel. I had to get it at least 2 inches from the table to make it stop.
Transistors: Both of these circuits use 3055 transistors. The ones from Radio Shack are erratic, some of them are quite strong, and others blow instantly. I got some 3055HV's from All Electronics, and so far haven't blown one. They have a heavier case and are rated for higher voltage and amperage. A very interesting page with lots more information on transistors can be found HERE.
Heat Sinks: Heat sinking for the transistors is the main thing, they get really hot. I was lucky to have some nice heat sinks laying around. And trust me, they get worked! One should use mica mounting washers to isolate the transistors from the heat sink. I have dispensed with that and been OK, just remember that the heat sink will be floating at RFHV. I don't touch the sink or any other component during operation anyway. Note that the transistors MUST be isolated if mounted on the same heatsink using the push pull circuit, or the collectors will be tied together. I got some TO-3 style mounts for easy changing of transistors, but you can just solder wire directly onto the leads instead. I sleeved the holes for the transistor leads through the heat sink with sections of plastic tube. Make sure that the sleeves do not stick out and prevent the transistor from making perfect contact with the heat sink when bolted down.
Power Supply: I am using a 5v/5amp/12v/15amp power supply that I got somewhere. For running 24v, I use two car batteries in series. What I would give for a beefy variable DC power supply! Except money, of course. Whatever supply you use should be rated for at least 10 amps at 12v. And you probably shouldn't use spendy/fancy supplies, or put a filter cap of at least 10,000uf across the power supply.
Grounding: I have a dedicated RF ground that is separate from the mains ground, so I ground all of the driver and flyback to it. The only thing connected to the mains voltage is the power supply. If you must use the mains ground, get an RFI (radio frequency interference) filter and run your power supply through it. Otherwise you can introduce RF into your mains lines, and potentially fry electronic items around your home.
Transformers: For the purposes herein, ones salvaged out of older equipment
are more likely to work well. The things to look for are (a) big disk style
secondary coil and (b) whether or not it has a built in diode. The size of the
secondary is an indicator of how high a voltage it will produce. It can be hard
to tell if a flyback has a diode in it or not, but you can always figure it
out when you run the system.
The built in rectifier diode is an issue depending on what you intend to do with the PSU. If you are going to power a plasma globe or a Tesla coil, you don't want a diode. If you are powering a Marx generator or other capacitor charging device, then the built in diode can be OK The problem with the built in diode is that it only half wave rectifies the current, and so around 55% of the output voltage is lost. This means that if your flyback is putting out around 20kV, you are only going to get 10kV or less.
Removing diodes from rubber encapsulated flybacks is easy, but epoxy encapsulate ones can be difficult and you are more likely to damage the transformer. A dremel type tool works well for excavating diodes from epoxy. So overall, flybacks without diodes are more desirable, and if you want DC you can easily make a full wave bridge for it and get all the voltage you deserve.
Construction Details: These steps vary depending on the flyback, so this is just what I did with one particular transformer. To check that your driver is working, discover your optimum primary turns and find the secondary ground tap, you can quickly wrap some windings on the transformer. However, before you push it hard, I recommend the following steps:
(1) Disassemble the transformer. Care must be taken during this step, don't hurt the windings or the ferrite core. Here is an exploded view of a flyback. Note that it is literally an "exploded" view, as this is the secondary I blew driving it too hard before properly preparing it.
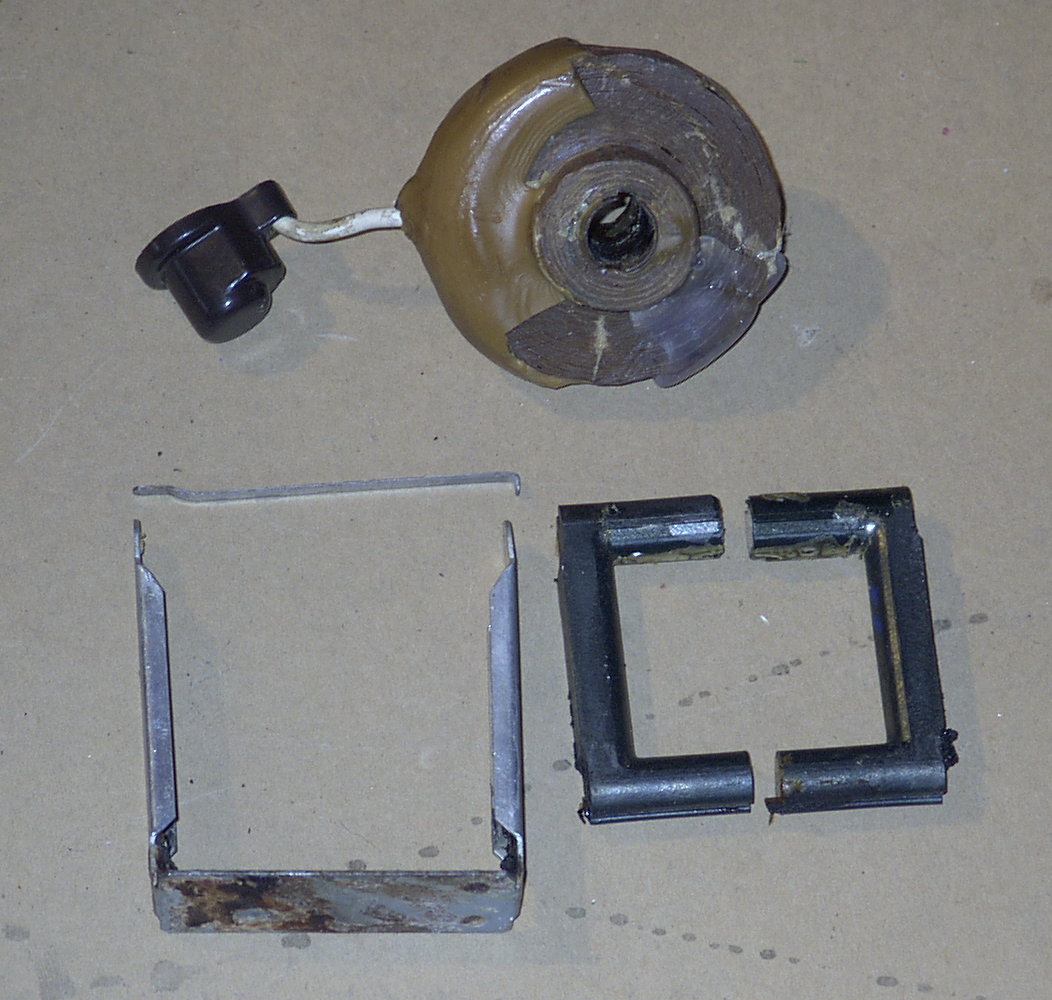
(2) Probe the leads on the transformer. In my case there were 6 contacts. The outer two proved to be the original primary, and the others were all secondary taps. Highest voltage is achieved by grounding the secondary at the base, which in my case was the second contact. Note that this was NOT the lead that had a wire attached to it. The original application must have wanted lower voltage. This is important, so experiment before performing drastic acts of modification. I removed all of the extra contacts and snipped the wires as short as possible. Insulating this area is detailed below.
(3) Insulate the secondary. These had a waxy insulation layer that was chipped. I removed it and used a tool dip type coating called "Rubberize-It", applying 10 coats at intervals to allow proper drying. I brushed it on instead of dipping it because I didn't want to get it in the hole for the core and have to clean it out. I suppose I could have plugged it. Here are two pictures of my newest secondary in progress.


The cavity shown in the first picture will be filled with hot glue once I reassemble the flyback. This is where I snipped off the primary and secondary wires. Hot glue is a great insulator, and it will also hold the secondary in place. Here is a picture with the cavity filled but without the contacts cut from a previous version.

Notice that the HV lead has glue around it and that the wire is strapped to the secondary. This is because I broke the wire, and had to solder a new one on, so be careful. Strapping it to the secondary is a bad idea corona/breakdown-wise, but I had no choice. The next time it breaks will be the last.
(3) Insulate the core. The core should have little insulation washers between the two halves of the ferrite core. Mine were cardboard and tore when I took the flyback apart, so I fashioned some new ones out of mica.The frame should be insulated from the core. I put heat shrink on the pin that holds the flyback together, as the insulation on the core in this area was old and crumbling. I also replaced the old insulation on the frame where it contacts the core. Clean all of the old glue off of the core.
(4) Wrap the primary and feedback windings. Use a cardboard core, coated in shellac or something similar. You can roll up a few layers of thin cardboard if you don't have a form the right size handy. Make sure it is as long as fits, but does not prevent the core from contacting properly. I then put a layer of electrical tape on it. In the picture below, I have a center tapped primary with one turn on each side, and a feedback winding of one turn on either side of the primary. The two inner wires of the secondary are connected together. Make sure you mark or otherwise know which wires are which before you bundle them together. This I did with heat shrink and vinyl tubing, and a final wrap of electrical tape. Note that this wasn't enough to prevent the arc over mentioned above. The latest transformer will have extra insulation here of this thick tape like stuff I got from All Electronics, and maybe some hot glue to boot.


(5) Reassemble the flyback. Glue the mica washers or whatever you are using to one side of the ferrite core. Carefully put it all together. Don't forget to put the primary/feedback coils on! I did and had to take it all back apart. Grr. Take your time and make sure none of your insulation is compromised. I solder a wire from the ground end of the secondary to the frame that holds the flyback together and then connect the frame to my RF ground.
I am working on a final flyback system now, and I'll post up pictures and details when I finish it.
Misc. Notes: Start with at least 4 turns on the primaries. Reduce one turn at a time, and watch carefully for serious corona build up or hissing from the transformer. I am going to dunk one in oil as soon as I find a suitable container, and then push it really hard, with say 1 turn on the primary and 24v in. Stand back! Anyway, be careful with the number of primary turns, or you are going to fry your flyback. Insulate! Insulate! Insulate! Remember that RF is weird and dangerous. Don't let the flyback or the output get anywhere close the driver circuit!
Links to more flyback stuff:
http://www.kronjaeger.com/hv/hv/src/fly/
http://www.geocities.com/lemagicien_2000/hvpage/hvfbpage/hvfb.html
http://www.geocities.com/CapeCanaveral/Lab/5322/fbt1.htm
http://www.powerlabs.org/flybackdriver.htm
http://www.stanford.edu/~gmiller/flyback.html
Questions? Comments? E-MAIL me!